
Scanning Your Photo Collections
One of the common scanning problems I have seen over the years with photos uploaded to FamilySearch has been one that is shown above. A photo is scanned on a flatbed scanner, but the person forgot (or didn't know how) to crop the photo so the rest of the scanner bed is not showing. Have you seen this before? If someone were to go back and crop the photo later, they would probably find the photo to be too low of resolution to be useful. When zoomed in on a bit, there would be a lot of pixelation noticed. We'll discuss more of this and about other common scanning concerns below.
Learn to Crop Your Photos
Cropping a photo is an easy task. Most newer scanners in the past 10 years will have a "Preview" function where the photo is scanned and you will see the full scanner bed. By clicking and holding your mouse cursor, you can then create a "marquee" around your photo. When you press "Scan", only the photo will scan. You will not have the full scanner bed in your final photo. That's an easy fix.
The 2nd way to crop a photo is by using photo editing software. It is a very easy fix as well. I have a tutorial on how to do this using PhotoPea.com. The tutorial can be found HERE
Fixing Color Tone Problems With Your Scans
Scanners will often have color correction and sharpening features on them that allow the photo to be scanned and then automatically enhanced. Many folks will use these features. I personally just like to get an untouched scanned photo, and will then color correct and do anything else I need in photo editing software. The main reason is that I have found that the scanning software can often induce more problems as it tries to fix your photo.
If you do use these features, be sure to preview your scanned photo, by zooming in on the photo, especially if sharpening is used. The digital image may look okay in a smaller size, but when "blown up" or zoomed in on, you will begin to see the imperfections that crop up. If you are seeing these, then it is best just to get a scan without using the additional scanner features.
Get to Know Your Scanner Settings
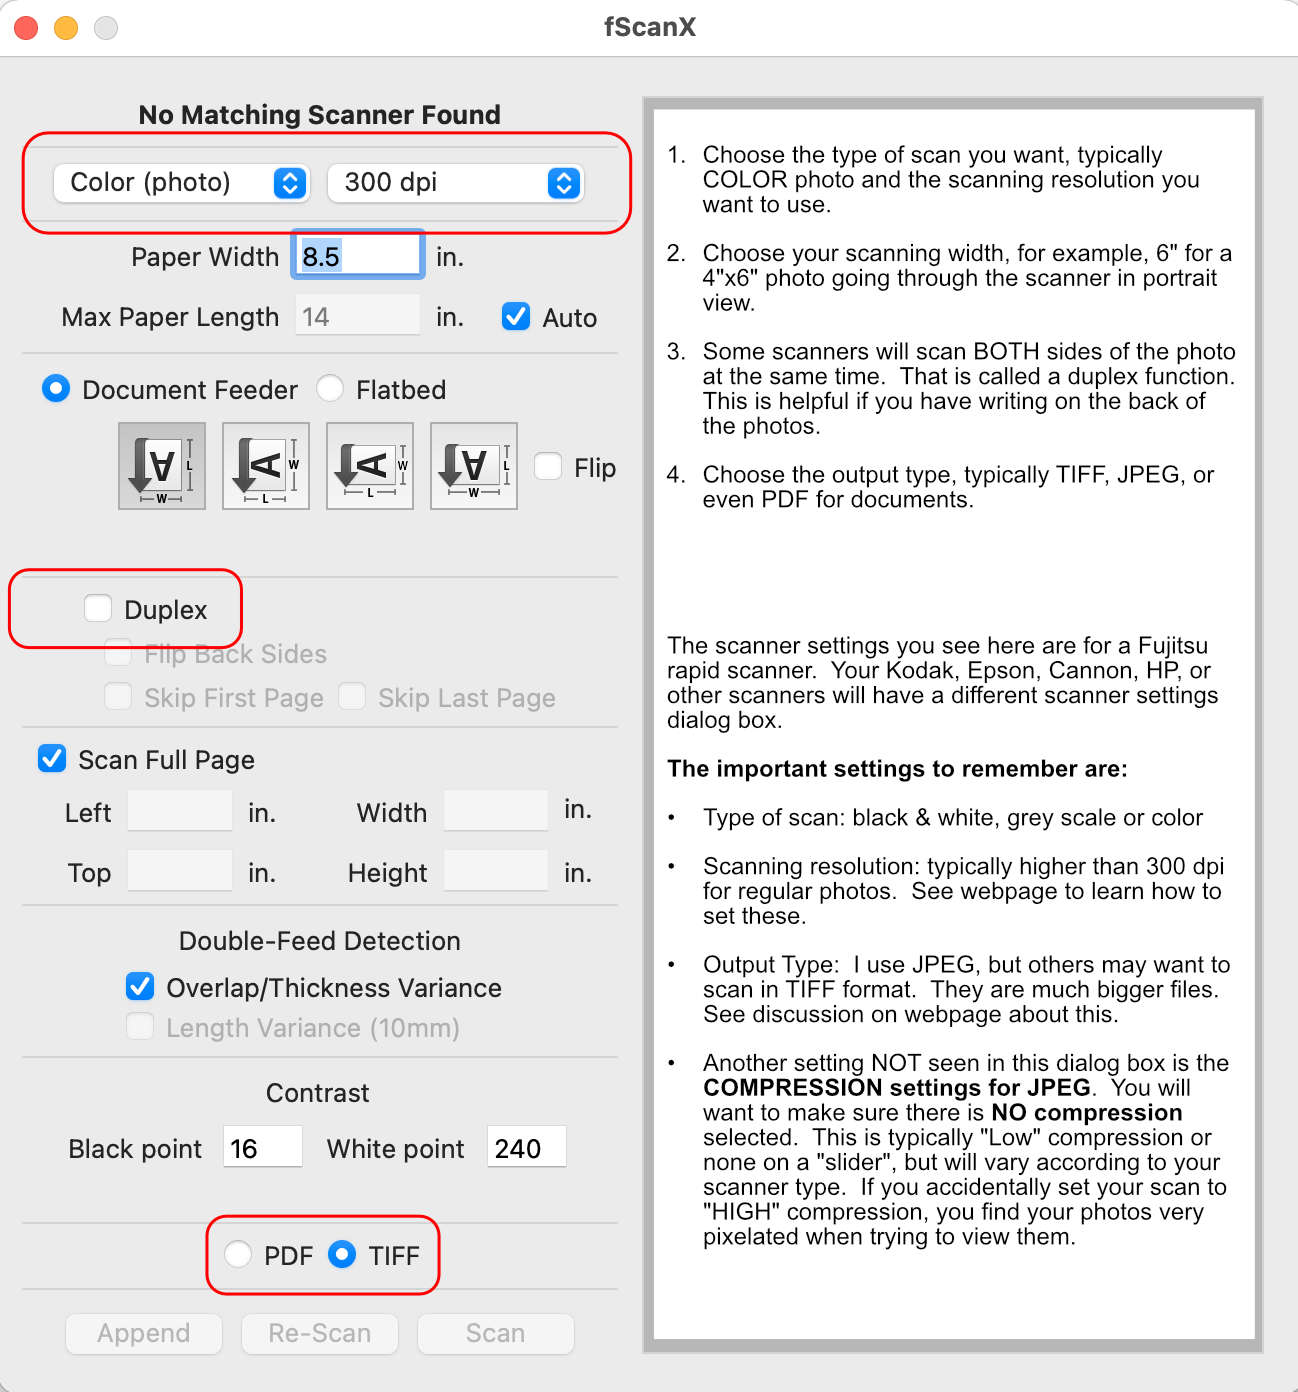
Other common scanning problems include not knowing how to set the scanner settings BEFORE you scan and then to save an uncompressed image. Scanners often have "default" settings that set the scanner to settings such as 300 dpi (dots per inch). While this is okay for full scanner bed sized documents, it will often NOT be good for scanning photographs, especially as they become smaller in size. You will be greatly limited by what you can do with these small photos if you do not choose a higher resolution.
What Scanning Resolutions Should I Use?
How can you know scanner resolution you should use? Ah…I have a webpage for you to review on this. Click on THIS LINK for more information. It may be a little confusing at first, but with a little study and practice, you will become expert in how to quickly figure out scanner resolutions for the size photos you are scanning.
Another common issue with scanner settings is that of "compression" when saving JPEG photos. The default setting assumes that you want to have good image quality but with some compression, meaning that it squeeze some of the photo data out of the original scan. It is ALWAYS preferable to NOT have any compression on your JPEG photos, especially if you decide to later do some editing on those photos.
Why spend hours scanning "less than adequate" photographs? Choose correct scanning resolution and no compression settings for your particular scanner brand.
The table below allows you to quickly select some scanner settings. Your scanner may have selectable settings for 450 dpi, 900 dpi, 3600 dpi, etc. You may want to more specifically choose a setting for your photo.

What You Will Do With Your Scanned Photos?

How you decide to start scanning depends on what you are planning to do with the scanned photographs. Scanning scrapbooks is often something not thought about. For example, if you scan a full page, then decide later you want to crop out one of the smaller photos on the page, you may find that the final cropped quality is greatly diminished. What if you decide to use a small photo to put in a print book later? You will need to ensure that the size of the photo is large enough and also the scanning resolution is at the minimum 300 dpi to make print quality.
What Kind of Scanners Are the Best to Use?
I have a webpage that discusses the different types of scanners that are used to scan different types of media. To get an idea about these different types of scanners, CLICK HERE.
If you have a lot of documents, such as histories, a document scanner works the best. For fragile document papers or photos, flatbed scanners work well. They do make what are called "carriers" which are plastic sleeves that go over the fragile paper, thus allowing you to put the document through a document scanner. If you want to quickly scan through a stack of photos, a rapid photo scanner is quick and easy. Scanners are made for slides and negatives as well.
Remember that many of the Family History Centers across the USA have multiple different types of scanners for you to use. But, again, be cautious in ensuring that you are using appropriate scanner settings, BEFORE you start scanning. The people before you may have totally messed with the scanner settings!